Monday, August 29, 2011

Lollie Christmas Lodge

Lollie Christmas Lodge
Just two more days until the Stampin' Up! Holiday Mini Catalog starts and I am so excited!  So many beautiful stamp sets, cute papers and the Simply Scored!  I pulled my new Simply Scored out to make the lollie for this card.  Love the way it scores so easily.  Ladies coming to my card buffet tonight will have a chance to use it themselves.
For this card I chose to enter three challenges.  The first for the sketch was The Friday Mashup FM#21 and the challenge was:
So here is how we are "MASHING IT UP" this week
Create a project using the provided "Sketch". or Create a project that has a "Dry Embossing on it". or "Mash it Up!" and create a card using the "Sketch with Dry Embossing".  So I chose to "Mash it Up!" using the Sketch and the new Snow Burst Textured Impressions Embossing Folder.
Snow Burst Textured Impressions Embossing Folder
 The next challenge I am entering is Cas-ual Fridays CFC #17 Their challenge this week is to use stickers(rub-ons are fine too if you don't have stickers) in your clean and simple design.  I chose to use the Season's Greetings from the Retired SU Chit Chat Rub-ons.

And the final challenge that I am entering this week is a color challenge over at In{k}spire Me Challenge #7
My free color I chose was Cherry Cobbler(my favorite).  The paper I used to make my lollie with is our new Frostwood Lodge in the new Holiday Mini.  This is my new favorite paper and I will be using it a lot in the coming months.   
I was just notified that I won runner up for this card and now I have a new badge:
Recipe:
Stamp:  Christmas Lodge
Ink: Soft Suede and Cherry Cobbler
Paper: Garden Green, Certainly Celery and Whisper White Card Stock, Frostwood Lodge DSP, Regals Collection Patterns DSP Stack
Accessories:  Big Shot, Snow Burst Textured Impressions Embossing Folder, Chit Chat Rub-ons(Retired), 2 1/2" Circle Punch, Decorative Label Punch, Simply Scored

Saturday, August 27, 2011

Wedding Flirtatious Specialty

Wedding Flirtatious Specialty
I have been enjoying myself the last two days just making cards to help my Mojo.  This card I combined two challenges to compose it.  The first is a {Mojo} Monday #205 and their sketch is as follows:
The second I chose for the fantastic colors and also for the addition of a handmade flower which I made by rolling satin ribbon to make the rose.  This is the first time that I have entered one of their challenges here: The Shabby Tea Room - Sweet Days of Summer and here is their inspiration photo:
When I saw the pinks and peaches I thought of our Flirtatious Specialty DSP and also of the beautiful doilies that come with the paper.  I cut two of the doilies out and thought they made a great flower on their own, then I added the rolled ribbon rose to the center.  Roses always make me think of weddings, so I chose a sentiment from our new stamp set Petite Pairs, this set is great because it gives you the outside as well as the inside sentiments for your card.
Recipe
Stamp:  Petite Pairs
Paper:  Pretty in Pink, Pink Pirouette, Rose Red and Peach Parfait Card Stock and Flirtatious Specialty DSP
Ink:  Rose Red Classic
Accessories:  1 1/4" Circle Punch, Pretty in Pink 5/8" Satin Ribbon, Blossom Bouquet Triple Layer Punch, Small Oval Punch, Scallop Edge Border Punch, Pinking Hearts Corner Punch, Pinking Hearts Border Punch, Snail Adhesive, Dimensionals

Monday, August 22, 2011

Fabulous Florets

Fabulous Florets Watercolor Re-inker  Technique
Today I designed a card for my technique class for September.  I am also entering it in two challenges.  The first is The Play Date Cafe where the challenge was to use Navy, Bubblegum pink and Leaf Green.
Also I am participating in the Card Patterns Sketch #129 and the Sketch looks like this:

Recipe:
Stamp: Fabulous Florets
Ink: Wild Wasabi and Pretty in Pink Re-inker
Paper:  Night of Navy, Regal Rose, Whisper White and Shimmery White Card Stock, Beyond the Garden DSP
Accessories:  Big Shot, Melon Mambo Embossing Powder, Heat Tool, Lace Ribbon Border Punch, 3/16" Corner Punch, Petals-a-Plenty Embossing Folder, Stripes Embossing Folder, 3 1/2" Circle Originals Die, 3" Circle Originals Die, Scallop Circle #2 Bigz Die

Sunday, August 21, 2011

I'm here for you Sunflower!

CR84FN I'm here for You Sunflower
My card that I created today for my upcoming Card Buffet on August 29th is made with my new favorite stamp, Sunflower, which is a background stamp.  I made this card for two different challenges.  First for So Shelli, Shelli Gardner is a co-founder and CEO of Stampin' Up! and her challenge was Thinking of You Creative Challenge. 
Then the second challenge was for CR84FN Color Challenge :
Recipe:
Stamps:  Sunflower, En Francais, Petite Pairs, Tagtastic(Hostess)
Ink:
So Saffron, More Mustard, Crumb Cake, Daffodil Delight
Paper:
So Saffron and Very Vanilla Card stock 
Accessories,
Dimensionals, Curly Label Punch, Stamping Sponges

Thursday, August 18, 2011

Soul Scrap Quest # 9 - Eastern Delights WITH A TWIST!!!!

Sometimes I have trouble with the MOJO!  So I joined this great group of ladies over at Soul Scrappers.
They have wonderful challenges that really get my creative juices flowing.  One of my favorite challenges is Soul Scrap Quest, here it is in their words:
What is Soul Scrap Quest?

You will be sent a pack of embellishments to use on your page. Everyone
receives the same items (color and size may vary). The concept is to
scrap a page using all or most of these items. You can add anything you
like but you must use all or most of your FREE STUFF!

By adding you name to the list you agree to use all or most of the FREE STUFF
supplied, make a card, layout, OTP, sewn item or a mixed media
item.......and then upload to the gallery using the code SSQ9 in the
title. This Quest allows you to create anything you want......

What makes this a QUEST unique..... is that until you open your
envelope you are really not going to know what is in it, and what you
are expected to use. Some of the embellies could be shop bought,
painted items, stickers, stamped images, polymer clay items, metal
items, hand pieced images, handmade flowers, sewn items, felt items
etc......... the list goes on!!

The only hint you will get is the theme, so for this challenge we will scrap to the theme 'Eastern Delights'
Now! I understand we are all not going to have Oriental/Asian photos in our collections...so, think outside the box IE, garden photos, water features, mountains, or don't even use a photo, instead paint or draw a scene.
Use a 'Confucious Quote' on your page :)

So the quote that I chose is: 
If I am walking with two other men, each of them will serve as my teacher. I will pick out the good points of the one and imitate them, and the bad points of the other and correct them in myself.

I went to the Kumakura Garden at Southern Illinois University at Carbondale, IL to take the pictures used on my pages.  This was such a fun challenge, join us over at Soul Scrappers and get challenged yourself.


Page 1 Kumakura Garden
Page 2 Kumakura Garden

SSQ9

Technique Class

On Tuesday night at our Technique Class, we learned two new techniques:

 
Open Sea Embedded Image
To do this technique you ink up your paper(after you have stamped your background design) with Versamark with the direct to paper technique.  Cover paper with clear embossing powder and heat with your Heat Tool.  While paper is hot cover with clear embossing powder again and heat again.  Let cool.  Rub with your Embossing Buddy (awesome product that keeps the static electricity from spreading your embossing powder where you don't want it).  Ink your stamp with Veramark and stamp.  Cover the image with a dark embossing powder and heat.  The black ink I used is melted into the clear embossing.  Very cool technique.
Ingredents:
Paper:
Naturals White and Crumb Cake Card stock,  Nautical Expedition DSP ( This paper qualifies for the Buy 3, Get 1 Free Promotion )
Ink:
Versamark
Stamp:
The Open Sea (only available until 8/31/11)
Accessories:
Big Shot, Perfect Pennants Bigz L Die, 2 1/2" Circle Punch, Heat Tool, Embossing Buddy, Black and Clear Embossing Powders, Cherry Cobbler Baker's Twine, Dimensionals

The next technique is a Baby Wipe Ink Pad.
Strength & Hope Butterfly Baby Wipe Technique
Fold a baby wipe in fourths and place on a plastic plate.  Starting with the darkest color of re-inker, start adding drops of it on the baby wipe in a shape similar to your stamp image.  With the second re-inker, add more drops to the wipe.  With the lightest colored re-inker, fill in all the white spaces left on the baby wipe.  Ink up the stamp using this makeshift inkpad.  I finished my demonstration and I thought, what could we do with the left over color on the inkpad?  I pulled out the glossy cardstock and we pulled the wipe over the cardstock and ended up with the above picture, too cool?
Ingredients:
Paper:
Naturals White and Glossy White Card stock
Ink:
Cajun Craze,Tangerine Tango and Daffodil Delight Classic Re-inkers
Stamp:
Strength & Hope (Available until 8/31/11 only)

Saturday, August 13, 2011

VC Rocks! Blog Hop - Punches Galore

Welcome to the last VC Rocks! Hop of the summer.  Those of you who follow me know it has been a really long time since I posted.  I spent more than a week helping my daughter and her husband move, then picked up a virus that has kept me in bed for almost two weeks!  So I haven't had much energy to stamp lately, but picked two cards from our card buffet that I hadn't  blogged about yet that use punches.

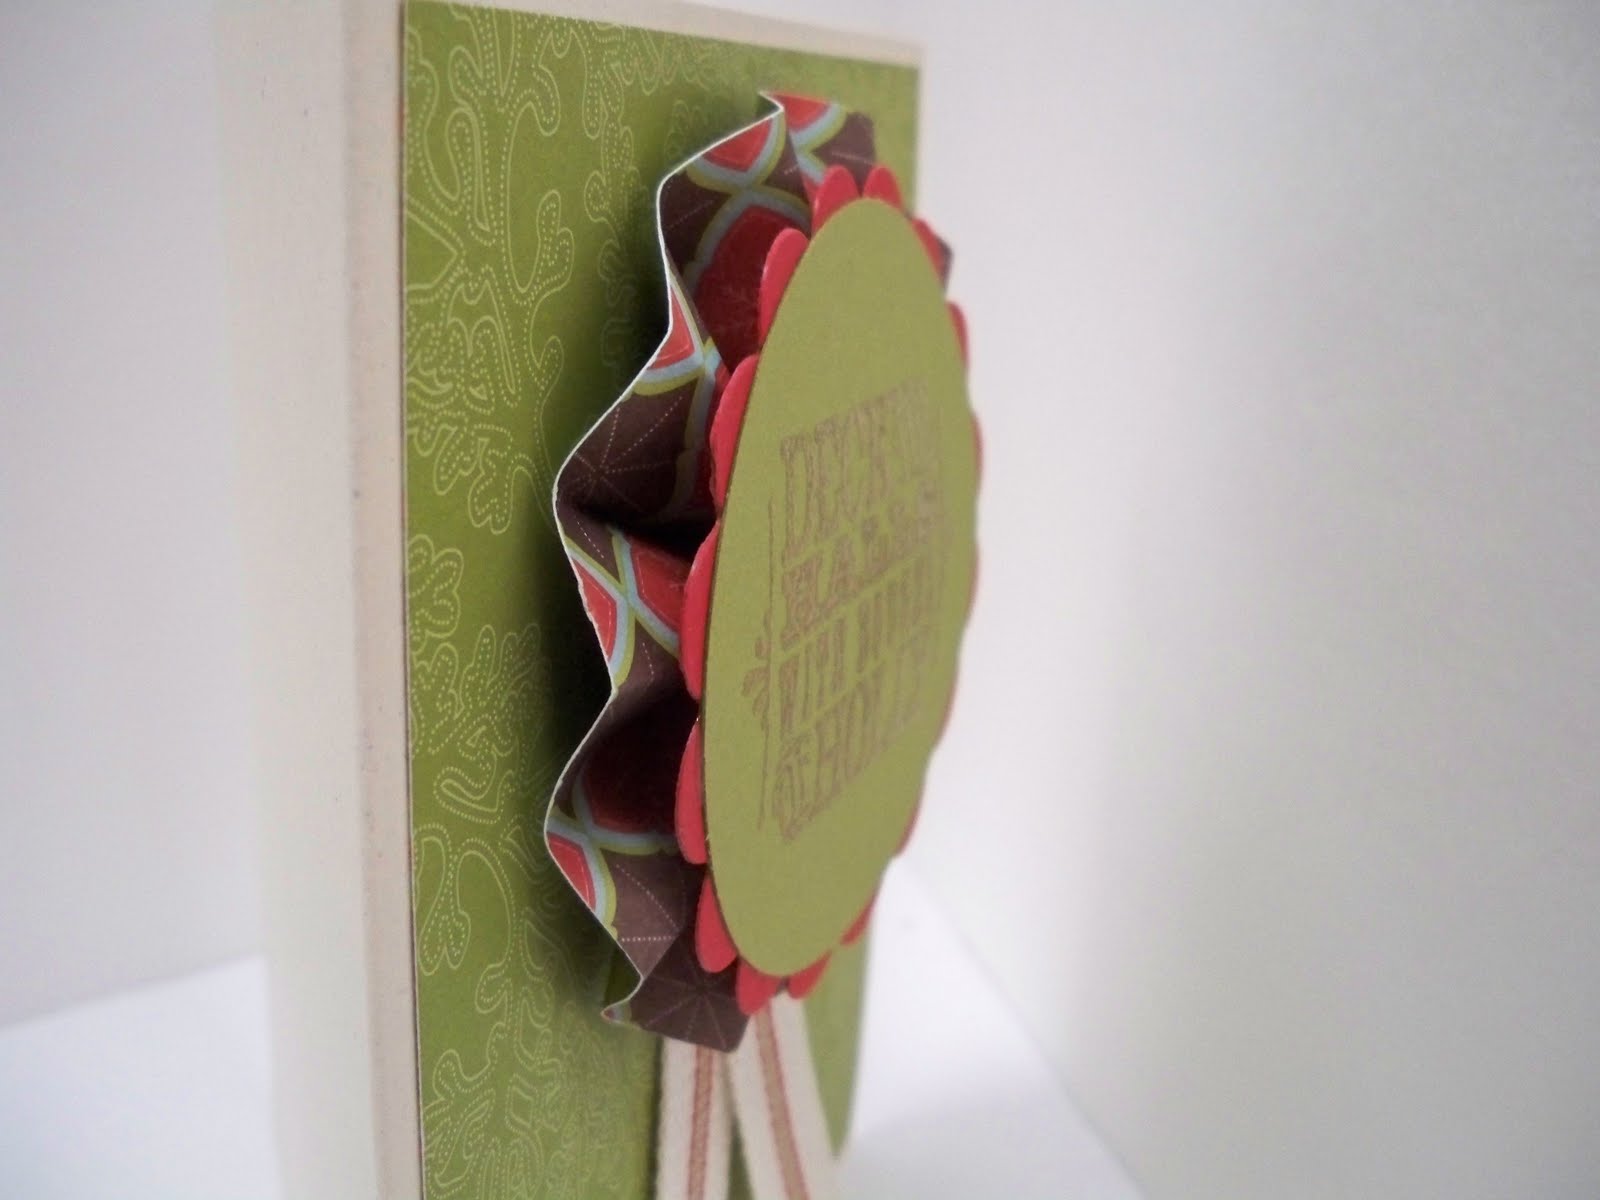
Rosette Christmas
The first card pictured I have been so inspired by every one on the web making rosettes.  They are so fun and easy to make especially now that Stampin' Up! has introduced the "Simply Scored" Scoring tool starting September 1st.  It also has a very unique feature added to it and that is place markers.  You just place them on the lines you want to score, no more remembering every time!
The top layer was punched out with the 2 1/2 Circle punch, then it was layered onto the scalloped circle that is on the new Perfect Pennants Bigz L Die in the new catalog.

This next card I fell in love with - purses out of the Cupcake Builder punch - just so cute!  This card could be used for a Thank You, Get Well, Thinking of You... the possibilities are endless.  First you cut out three of the bottoms of the cupcake and turn them upside down.  Then punch three 1/2 circles from the 3/4" Circle Punch, this makes the flap of the purse(On our circle punches at the half-way point, the punch dips down).  Then reinsert the circle punch into the former punched area and punch a slice for the handles.  I attached a pearl and after gluing the entire purse together, used dimensionals to prop it up on the card.  Too cute and so easy to make.
The Perfect Little Purse Card


00 VC Rocks Blog Home
01 Carey R Pedstamper Stamping Tree House
02 Linda R Pretty Inky Papercrafts
03 Sharon F Created By You
04 Patrice H My Little Patch of Dirt
05 Angela W Life with a Wiener Dog
06 Karen G Krafting with Karen
07 Kim A Stamping Fun with Kim
08 Janice H Stamping With Janice
09 Nichole S Scrappy Stamps & Ink
10 Jane H Stamp With Jane
11 Nancy K Scrapbook Kits and More
12 Elizabeth K Elizabeth's Stamp Room
13 Elaine W I Reckon I'll Stamp
14 Carolyn S InkingTheNightAway
15 Kris S Maddiebug Designs
16 Heidi S Cheekie's Ink Pad
17 Holly & The Dog InkPaperStamps
18 Shari D Shari's Stamp Pad
19 Stace C Stampin Stace
20 Diane   Stampin Ldyglfr62
21 Kym Artful Imagination
22 Barb F The Love of Stamping
23 YOU ARE HERE:  Debbie M Clever and Cute
24 Shirley N  Stamper Shirley
25 Ellen K Blinkin', Thinkin' & Inkin'
26 Loni H Loni's Life

Sunday, July 17, 2011

Hello Doily and Grannie Smith Remembered

As soon as I saw Hello Doily in the new SU Idea Book and Catalog, I thought of my maternal grandmother, Ethel Smith.  I don't think that I have too many memories of my grandmother that didn't include a crochet hook or knitting needle in her hand.  She was a true artist.  She had macular degeneration in her senior years and she still was able to produce flawless creations with out patterns and her hands moved so fast, it was fascinating to watch.  This card says it all:
Grandma's Doily

I have entered this card in two challenges.  The first is at a new challenge blog and their first challenge: IN(K)SPIRE_me.  This was a real challenge for me to have this large color combination.  I did not have ribbon in any of these colors, so I dyed 5/8" Organza Ribbon with my Poppy Parade Marker, didn't it turn out great?  I embossed resisted with Peach Parfait, stamped my Remember When with Bravo Burgundy and set it all on a Melon Mambo card base.
The other challenge that I entered with this card is over at: "Less is More".  Their Week #24 Theme is Circles.  I thought that the Hello Doily and the Delicate Doilies stamp sets are circles.  Check out all of the other entries for these two challenges, lots of talented ladies have entered.

Blossom Party & Faux Cloisonne

I have been designing cards for my upcoming card buffet and wanted to share one with you.  My daughter, Luella, was with me for five days and we always have a great time together designing cards and making 3D projects.  I love this retired DSP and wanted a flower to show it off so it reminded me of the Blossom Party die, it is really sad that I have had this die for over a year and never used it. :(  But the great part of having a card buffet is that I am getting all of my DSP out and my dies and having a great time creating!
Blossom Party

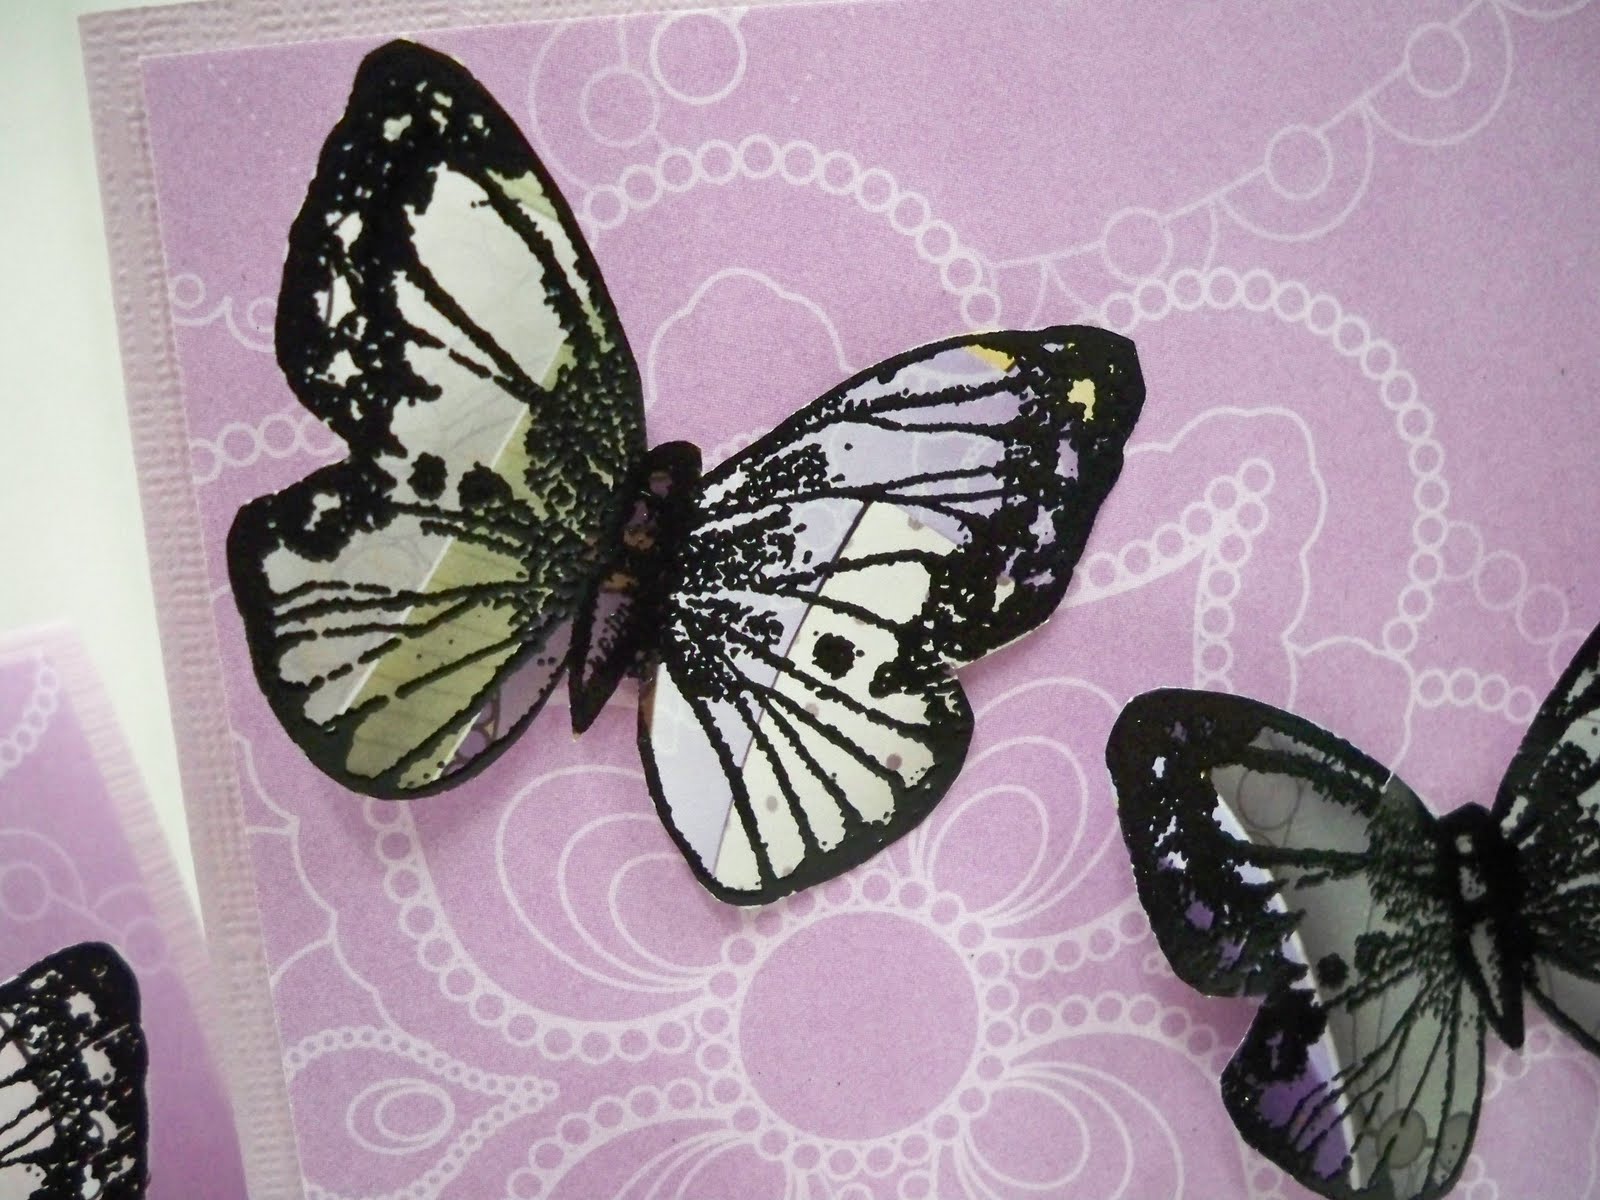
Isn't it just too cute?  The next card we learned how to do Faux Cloisonne in our Technique class Thursday night and I have decided to add it also to the card buffet since I love how the butterflies turned out.  Do you have a lot of glossy catalogs or old Stampin' Up! Catalogs hanging around?  When I started cleaning out my stamp room last week, I couldn't believe how many I had still, but we put them to good use with this Technique.  First the cards:
Faux Cloisonne with Flores Suaves


Isn't the butterfly so lifelike?  It is from the Flores Suaves (Soft Flowers) stamp set.  First we found a picture in the colors we wanted to use for the butterfly, then rubbed over the image with the Embossing Buddy then stamped the image using Versamark, sprinkled on black Emboss Powder (you could also use gold or silver) then heated it with a Heat Tool.  Cut them out by hand and the paper ends up feeling like plastic and really takes a bend well.  This technique works well with open stamps (not a solid image) like this butterfly or a flower.  Check out my next post that qualifies for two challenges.

Friday, July 8, 2011

VC Rocks! Blog Hop - ABC - Anything But a Card


This VC Rocks! Blog Hop is about Anything but a Card, ABC.  This week in class we made a purse to hold cards.  I have seen several purses out there to buy, but I always try to find free.  This purse template I found on Bridget Louw's website, but it was only large enough to hold 3x3 cards.  I wanted a purse that would hold A2 (4 1/4 x 5 1/2) cards. So after fussing around for several hours I can up with this:

Paisley Petals Purse
This purse can hold eight A2 cards.  I used glimmer paper for the buckles on the purse.  Love it!  I know that this is ABC, but I had to show you the cards we made to go into the purse, thanks to Margaret Moody for her inspiration for these.
Purse with Card
 
 I made a second purse with the class and I love this one even more:
White Paisley Petals Purse
Buckle
 I have been wanting to make one of the following projects for over a year and this hop gave me the opportunity to finally make one.  The instructions for the tissue box cover can be found here: Split Coast Stampers-Tissue Box Cover and a big thank you to Cindy for suggesting that I use my new Sunflower Background Stamp(just came in tonight's UPS box) to decorate it with.


Sunflower Tissue Box Cover
I received my first box of goodies tonight from the new Idea Book and Catalog.  I fell in love with the new Beau Chateau DSP and here is a sneak look at the Side Notes that you can buy to go along with the DSP.  There are two of each die-cuts included and it is on beautiful watercolor paper.  I can't wait to make an album from this paper.  So here they are:

Won't they be so cool on a scrapbook page or on a card front?  I have added at the top right column a button to get emails when I post new blog pages, sign up if you would like to follow me.  Now on to the next blog.  Have a great day!


The talented stampers and scrappers of VC Rocks have tackled the theme of Anything But a Card.   So grab your favorite beverage and a snack and enjoy our hop.   The hop officially kicks off at 10AM Eastern/9AM Central, 8AM Mountain, 7AM Pacific on Saturday and will run through the weekend.

00-START VC Rocks Home Blog art by Debbie Petersen
01 Holly & The Dog InkPaperStamps
02 Elizabeth Kratzer Elizabeth's Stamp Room
03 Elizabeth M. Harris Love 2 Stamp
04 Jackie Watson Creative Designs by Jackie
05 Marisol Gutierrez A Touch of SOL
06 Stace Coombs Stampin' Stace
07 Jane Hignite Stamp With Jane
08 Barb Furlong The Love of Stamping
09 Kim Abbott Stamping Fun with Kim
10 Angela Walters Life with a Wiener Dog
11 Dawn Hoffman Stampin' At Dawn
12 Sharon Field Created By You
13 Shirley Northey Stamper Shirley
14 Angela Khan Scrappin' For Sanity
15 Veronica Miller Bluegrass Stamper Studio
16 Mary Jo Price-Williams Technostamper
17 Carolyn Sharkas InkingTheNightAway
18 Jamie Adcock Wanna Be Creative
19 Nancy Keithley Scrapbook Kits and more
20 Patrice Herrera My Little Patch of Dirt
21 Elaine Wright I Reckon I'll Stamp
22 Brenda Hugar Brenda's Stamping Corner
23 Kris Sobolik Maddiebug Designs
24 Kristi Jaenisch Stamping in the Moonlight
25 Eileen LeFevre Stampin' Fevre
26 Kym Schwinkendorf Artful Imagination
27 Linda Rodenberg Nichole's Stampin' Corner
29 You are here: Debbie Martin Clever and Cute
30 Mary Campbell Mimi To Jett

31Shari Dudek Shari's Stamp Pad
32 Carey Rogers Pedstamper's Stamping Tree House
33Ellen Kemper Blinkin' Thinkin' & Inkin'
34 Karen Gibson Krafting With Karen
35-LAST Loni Holt Loni's Life

Thursday, June 30, 2011

Card Buffet

I am so sad to be leaving my favorite Designer Series Papers behind and some of my favorite stamp sets, but so excited that the new catalog goes live tomorrow!  The last two months I have started having card buffets.  We are having so much fun at these classes.  I have been using retiring paper and falling in love with them and today is the last day to order them.  I found my mojo yesterday and I have been designing cards like crazy.  Here are the cards for our next buffet: